
Discover the Mini Bean Stitch, a simple crochet technique that creates a dense, elegant texture. Quick to work up, it’s perfect for adding a polished look to blankets, scarves, and other handmade projects.

Mini Bean Stitch
Many people find this style perfect for beginner crochet projects. It relies on basic movements that are easy to master, helping you build confidence as you create. By learning this method, you will unlock a versatile skill that serves as a solid foundation for your future creative journey.
Key Takeaways
- The texture is dense, warm, and visually appealing for various projects.
- It is an ideal choice for those exploring beginner crochet techniques.
- The pattern is simple to execute, ensuring a quick and rewarding experience.
- You can use this versatile design for blankets, hats, and home decor.
- Mastering this skill helps build confidence for more complex future designs.
Understanding the Mini Bean Stitch
Understanding the mechanics behind the Mini Bean Stitch is the first step toward creating professional-looking fabric. Unlike standard stitches that rely on simple loops, this technique involves a specific sequence of yarn overs and pulls that create a dense, knotted appearance.
Mini Bean Stitch crochet texture
What makes the Mini Bean Stitch unique
The primary appeal of this stitch lies in its incredible squishiness and structural integrity. While basic stitches often result in a flat or thin fabric, this method builds up layers of yarn to create a thick, warm material.
“The beauty of the Mini Bean Stitch is found in its ability to transform simple yarn into a rich, tactile experience that feels substantial in your hands.”
Because of its construction, it consumes slightly more yarn than a standard single crochet. However, the trade-off is a durable crochet texture that holds its shape beautifully over time.
Visual characteristics and texture
Visually, the stitch resembles a series of tiny, slanted beans lined up in neat rows. This creates a sophisticated look that works well for both modern and traditional designs.
When you compare it to basic stitches, the difference in crochet texture becomes immediately apparent. The following table highlights how this stitch stacks up against common alternatives:
| Stitch Type | Texture Level | Best Use Case |
| Single Crochet | Flat/Smooth | Amigurumi |
| Double Crochet | Open/Drapey | Garments |
| Mini Bean Stitch | Dense/Squishy | Blankets/Accessories |
By choosing the Mini Bean Stitch, you are opting for a pattern that provides both visual interest and a high-quality feel. It is a versatile choice for any crafter looking to elevate their work beyond the basics.
Essential Tools and Materials
Crafting beautiful textures starts with choosing the perfect materials for your hands. When you work with the Mini Bean Stitch, your choice of supplies directly influences how the final fabric feels and hangs. Taking a moment to gather the right items ensures your project turns out exactly as you imagined.

yarn weight and crochet hook size
Choosing the right yarn weight
The yarn weight you select acts as the foundation for your stitch definition. A lighter weight yarn, such as fingering or sport, creates a delicate and intricate look that works well for lightweight garments. Conversely, using a worsted or bulky weight yarn produces a dense, squishy fabric that is perfect for warm blankets.
Always consider the intended use of your item before you buy your materials. If you want a soft drape, choose a fiber with a bit of natural elasticity. If you prefer a structured piece, a tighter twist yarn will hold the shape of the stitch much better.
Selecting the appropriate crochet hook size
Matching your crochet hook size to your chosen fiber is the secret to professional results. If your hook is too small, your stitches will feel stiff and become difficult to work into during the next row. If the hook is too large, the fabric will look gappy and lose the beautiful, tight texture that makes this stitch so popular.
To find your perfect match, consider these general guidelines for common projects:
- Lightweight projects: Use a 2.5mm to 3.5mm hook for fine, detailed work.
- Standard garments: A 4.0mm to 5.0mm hook works best for most medium-weight yarns.
- Cozy home decor: Opt for a 5.5mm or larger hook to create a thick, plush feel.
Always remember to create a small swatch before starting your main project. This simple step allows you to see if your tension matches the pattern requirements. Adjusting your hook size slightly can often fix minor issues with density or drape, giving you full control over your finished creation.
Mastering the Foundation Chain
Your journey into the world of beginner crochet starts right here with the humble foundation chain. This simple row of loops serves as the structural backbone for your entire project. Taking the time to perfect this step ensures that your finished piece looks polished and professional from the very first row.
Calculating your starting chain
Before you begin, it is helpful to understand the math behind your foundation chain. Most patterns provide a specific multiple for the starting chain, which allows the stitch pattern to repeat evenly across the width of your work.
If you are designing your own project, remember that your chain will often shrink slightly once you work the first row of stitches into it. It is usually a good idea to chain a few extra stitches just in case. You can always unravel the excess chain at the end, which is much easier than starting over because your piece is too narrow.
Tips for maintaining consistent tension
Achieving even stitch tension is a skill that develops with practice and patience. If your chains are too tight, it becomes difficult to insert your hook into the loops during the next row. Conversely, chains that are too loose can create gaps that make your edges look messy.
To keep your work uniform, try to hold your yarn with a consistent grip that allows it to flow smoothly through your fingers. Relax your hands frequently to avoid cramping, as tension in your muscles often translates directly into tight, uneven stitches. If you find your chain is naturally too tight, consider using a crochet hook that is one size larger just for the foundation row to give your work more flexibility.
Step-by-Step Guide to the Mini Bean Stitch
Mastering this stitch requires a simple, rhythmic approach that yields stunning results. By following a clear crochet pattern, you can easily create the dense, textured fabric that defines this popular technique. Let’s break down the process into manageable steps to ensure your success.
Executing the first stitch
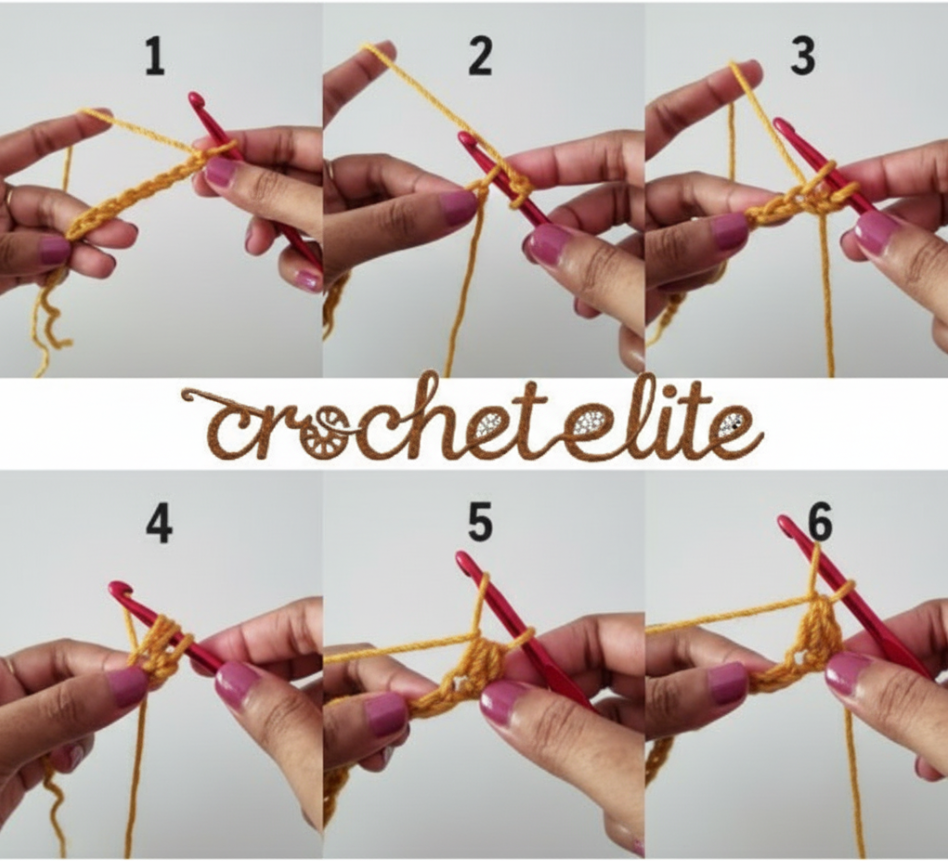
To begin, insert your hook into the designated stitch or chain space. Yarn over and pull up a loop, giving you two loops on your hook. Yarn over again and insert your hook back into the same space, pulling up another loop.
You should now have four loops on your hook. Yarn over one final time and pull through all four loops at once. Secure the stitch by chaining one to lock the cluster in place.
Working across the row
Once you have completed your first cluster, skip the next stitch in your foundation chain. Repeat the previous process in the following stitch to maintain the correct spacing. This alternating rhythm is the secret to a beautiful Mini Bean Stitch design.
- Insert hook, yarn over, and pull up a loop.
- Yarn over, insert hook into the same space, and pull up a loop.
- Yarn over and pull through all four loops on the hook.
- Chain one to complete the cluster.
Turning and starting the next row
When you reach the end of your row, turn your work to prepare for the next section. Chain one or two, depending on your specific crochet pattern requirements, to reach the necessary height. You will typically work your next set of stitches into the chain-one spaces created by the previous row.
Consistency is key when working the Mini Bean Stitch across multiple rows. Keep your tension even to ensure that each cluster looks uniform and professional. With a little practice, you will find that this stitch becomes second nature, allowing you to create intricate textures with ease.
Common Mistakes and How to Fix Them
Crochet troubleshooting is a skill that every maker should keep in their toolkit for those inevitable moments of frustration. Even experienced crafters encounter challenges, but these hurdles are simply opportunities to refine your technique. By learning these simple fixes, you will maintain a professional look throughout your entire project.
Avoiding uneven edges
One of the most common issues involves edges that appear wavy or jagged. This usually happens when you skip the first stitch or accidentally add an extra one at the end of a row. Always count your stitches carefully to ensure your edges remain straight and clean.
Using a stitch marker in the first and last stitch of every row can be a game-changer. This simple habit helps you identify exactly where to place your hook, preventing those accidental increases or decreases that ruin your symmetry.
Correcting dropped loops
If you accidentally pull your hook out and lose your working loop, do not panic. Simply insert your hook back into the loop and gently pull the yarn to tighten it to the correct size. Consistency is key when you are resetting your tension after a slip.
If the loop has unraveled several stitches, use a smaller crochet hook to carefully pull the yarn back through the loops. This method saves you from having to frog your entire row. Taking your time during this process ensures your stitch remains uniform with the rest of the fabric.
Troubleshooting stitch count errors
Stitch count errors often occur because the final stitch of a row is hidden or tight. It is easy to miss the turning chain or the last stitch of the previous row. Always verify your count before you turn your work to start the next section.
If you find your count is off, work backward one stitch at a time until you locate the error. Identifying the mistake early prevents the need to unravel large portions of your work. Keeping a small notepad nearby to track your row counts can also help you stay organized.
| Common Issue | Primary Cause | Quick Fix |
| Wavy Edges | Skipped stitches | Use stitch markers |
| Dropped Loop | Loose tension | Re-insert and tighten |
| Wrong Count | Hidden end stitch | Count every row |
Variations of the Mini Bean Stitch
Expanding your repertoire with new techniques makes every project feel fresh and exciting. Once you have mastered the basic construction, you can explore various creative possibilities to elevate your work. The Mini Bean Stitch is incredibly versatile, allowing you to adapt it to almost any design you can imagine.
Working in the round
You are not limited to flat, back-and-forth rows when using this technique. By working in the round, you can create seamless hats, cowls, or even circular bags. Simply join your rounds with a slip stitch and remember to chain one before starting your next set of stitches to maintain a clean, professional look.
Combining with other stitches
Mixing textures is a fantastic way to add depth to your handmade items. Try alternating rows of the Mini Bean Stitch with simple double crochet or airy chain spaces to create a unique fabric. These crochet variations allow you to control the density and drape of your finished piece, making it perfect for custom garments.
Creating color-blocked patterns
If you want to make a bold statement, color-blocking is the perfect approach. You can switch yarn colors at the end of a row or even mid-row to create geometric designs. Using contrasting shades highlights the beautiful, clustered texture of the stitch, ensuring your project stands out as a true work of art.
Best Projects for the Mini Bean Stitch
From cozy home essentials to stylish accessories, the Mini Bean Stitch offers endless creative possibilities for your next project. This versatile technique creates a dense, beautiful fabric that stands out in any handmade collection. Whether you are a beginner or an experienced maker, you will find that this stitch adds a professional touch to your work.
Creating cozy blankets and throws
When you want to make crochet blankets that provide extra warmth, this stitch is an excellent choice. The tight construction traps heat effectively, making it perfect for chilly evenings on the couch. Because the stitch is so sturdy, it holds its shape well even in larger sizes.
Designing textured scarves and cowls
If you are looking to elevate your winter wardrobe, consider using this stitch for crochet scarves and cowls. The unique crochet texture provides a sophisticated look that pairs beautifully with solid-colored yarns. You can easily follow a simple crochet pattern to create a piece that feels soft against the skin while maintaining a structured, high-end appearance.
“Texture is the soul of a handmade piece; it invites the touch and tells a story of the maker’s patience and skill.”
Crafting durable home decor items
Beyond wearables, the Mini Bean Stitch is ideal for various crochet projects that require durability. It works wonderfully for items like thick pot holders, sturdy storage baskets, or decorative throw pillows. The density of the stitch ensures that these items remain functional and attractive for years to come.
| Project Type | Yarn Weight | Best Feature |
| Blankets | Worsted/Bulky | Maximum Warmth |
| Scarves | DK/Worsted | Beautiful Drape |
| Home Decor | Cotton/Blend | High Durability |
Tips for Professional Results
Elevate your handmade creations by mastering these essential finishing techniques. While the stitching process is rewarding, the final steps are what truly distinguish a hobbyist project from a professional-looking piece. Following these crochet tips will ensure your work looks neat, structured, and durable for years to come.
Blocking your finished piece
Blocking crochet is the secret weapon for achieving a uniform and professional appearance. This process involves gently wetting or steaming your fabric to relax the fibers and set the stitches into their final shape.
By pinning your work to a foam mat, you can correct minor tension issues and ensure your edges are perfectly straight. This step is particularly effective for the Mini Bean Stitch, as it helps the texture pop while smoothing out any slight irregularities from the hook.
Weaving in ends securely
Nothing ruins a beautiful project faster than loose ends unraveling over time. To keep your work secure, always use a tapestry needle to weave your yarn tails back and forth through the stitches on the wrong side of the fabric.
- Work the tail in at least three different directions to lock it in place.
- Avoid cutting the yarn too close to the knot to prevent it from popping out.
- Use a smaller needle if the yarn is thick to avoid stretching the fabric.
Managing yarn transitions
When working with multiple colors, clean transitions are vital for a polished look. Instead of carrying yarn across long distances, consider joining new colors at the start of a row or using the invisible join method.
If you must carry yarn up the side of your work, twist the strands together every few rows to prevent long, loose loops. This simple habit keeps your edges tidy and makes the final border application much easier to manage.
Comparing Mini Bean Stitch to Similar Stitches
Many crocheters wonder how the Mini Bean Stitch stacks up against other popular textured patterns. Understanding the subtle differences between these techniques allows you to select the perfect stitch for your specific design goals.
By analyzing the density and visual impact of each option, you can ensure your finished project looks exactly as you envisioned. Precision in your stitch choice is often the secret to professional-looking handmade items.
Mini Bean versus standard Bean Stitch
The primary difference between these two lies in the number of yarn-overs and loops pulled through the stitch. The standard Bean Stitch is typically larger and creates a more pronounced, rounded bump on the fabric surface.
In contrast, the Mini Bean Stitch is more compact and subtle. It offers a refined texture that is ideal for projects where you want a delicate, uniform look rather than a bulky, heavy finish.
Mini Bean versus Puff Stitch
While both stitches add depth, the Puff Stitch is generally much softer and more voluminous. It requires pulling up several long loops, which creates a plush, cloud-like appearance that is perfect for cozy winter accessories.
The Mini Bean Stitch, however, provides a firmer, more structured fabric. It is highly durable and holds its shape better over time, making it a superior choice for home decor items that see frequent use.
| Stitch Type | Texture Level | Best Use Case |
| Mini Bean Stitch | Subtle/Firm | Home Decor |
| Standard Bean | Moderate/Rounded | Blankets |
| Puff Stitch | High/Plush | Scarves |
Ultimately, choosing between these options depends on the desired weight and feel of your fabric. Experimenting with the Mini Bean Stitch alongside these alternatives will help you master the art of texture in your crochet work.
Caring for Your Mini Bean Stitch Creations
Your handmade creations deserve the same love and attention you poured into every stitch. Taking the time to properly maintain your items ensures they remain beautiful and functional for years to come. With just a few simple habits, you can keep your textured projects looking as fresh as the day you finished them.
Washing instructions for handmade items
Most crochet items benefit from a gentle touch when it comes to cleaning. Always check your yarn label first, as different fibers require specific handling to prevent shrinking or damage. Hand washing in cool water with a mild detergent is generally the safest method for delicate pieces.
Avoid wringing or twisting your fabric, as this can distort the unique texture of the stitch. Instead, gently squeeze the water out and lay the item flat on a clean towel to air dry. Keeping your piece away from direct heat sources will help maintain its original shape and vibrant color.
Storage tips to maintain texture
Proper storage is just as important as washing when it comes to preserving your hard work. To keep the stitch definition crisp, avoid hanging heavy blankets or scarves, as the weight can cause them to stretch out of shape over time. Folding your items neatly is the best way to protect the delicate structure of the pattern.
If you are storing items for a long season, use breathable cotton bags rather than plastic containers. This prevents moisture buildup and keeps your fibers feeling soft and fresh. The following table provides a quick reference for handling different common yarn materials used in your projects.
| Fiber Type | Washing Method | Drying Recommendation |
| Cotton | Machine wash gentle | Lay flat to dry |
| Wool | Hand wash cold | Dry flat in shade |
| Acrylic | Machine wash warm | Tumble dry low |
| Alpaca | Hand wash only | Lay flat on towel |
Conclusion
The Mini Bean Stitch offers a unique texture that elevates any handmade project. You now possess the knowledge to transform simple yarn into sophisticated, professional-quality textiles.
Consistent practice remains the best way to refine your tension and speed. Try incorporating this stitch into your next Lion Brand or Red Heart yarn project to see how the pattern behaves with different fibers.
Experimenting with various hook sizes from brands like Clover or Susan Bates will reveal new possibilities for your designs. Each swatch you create builds your confidence and expands your creative toolkit.
Share your progress with the vibrant crochet community to inspire others. Your dedication to learning these techniques ensures that every piece you craft reflects your personal style and skill. Keep your hooks ready and enjoy the process of creating beautiful, lasting items.
FAQ
Is the Mini Bean Stitch suitable for someone just starting their crochet journey?
Absolutely! The Mini Bean Stitch, also known as the Elizabeth Stitch, is a fantastic beginner crochet project. It builds on basic skills while creating a dense, beautiful texture that looks much more complex than it actually is to execute.
What is the best way to choose a yarn weight and crochet hook size for this pattern?
The choice depends on your project goals. For a squishy crochet texture, many crafters love using a worsted weight yarn like Lion Brand Vanna’s Choice with a 5.0mm or 5.5mm crochet hook size. If you want a more delicate drape for textured scarves, a lighter DK weight yarn works wonders.
How do I calculate the math for my starting chain?
To get your project off to a great start, you generally need to work with an even number of chains. When calculating your starting chain, ensure you have enough length for your desired width, plus one extra chain for the turning height.
How does the Mini Bean Stitch differ from a standard Bean Stitch or a Puff Stitch?
While they all offer great visual characteristics, the Mini Bean is more compact and less “puffy” than a Puff Stitch. Compared to the standard Bean Stitch, it is slightly smaller, making it perfect for durable home decor items where you want a tight, warm fabric without too much bulk.
My edges are looking a bit wonky—how can I fix uneven edges?
A: Avoiding uneven edges is all about maintaining consistent tension and ensuring you are turning and starting the next row in the correct stitch. If you find your work is curling, try loosening your foundation chain or using a hook one size larger for the very first row.
Can I use this stitch for something other than flat blankets?
Yes, it is incredibly versatile! You can try working in the round to create seamless cowls or crafting durable home decor items like throw pillows. It also looks stunning when creating color-blocked patterns by switching yarn transitions every few rows.
What are the best tips for achieving professional results with my finished piece?
To truly make your work shine, don’t skip blocking your finished piece. Using a blocking mat and some T-pins helps even out the mini bean clusters. Additionally, focus on weaving in ends securely using a tapestry needle to ensure your hard work doesn’t unravel during use.
How should I wash and store my handmade Mini Bean Stitch creations?
Always check the fiber content on your yarn label first. Generally, for items made with Red Heart Super Saver or similar acrylics, a gentle machine wash is fine. To maintain texture, lay the item flat to dry. For long-term storage, fold your cozy blankets loosely rather than hanging them to prevent the fabric from stretching out of shape.
to be first know about our crochet pattern visit our Facebook page