
Tranquil Garden Crochet Blanket Pattern: The Complete Free Guide
Every stitch, every round, every finishing secret — so you can make this stunning floral blanket with total confidence from row one.
The Tranquil Garden Crochet Blanket Pattern has earned its reputation quietly — shared in group chats, pinned to mood boards, photographed in soft morning light draped over armchairs. It looks intricate. It photographs like something from a boutique. And yet it’s built entirely on three stitches that every beginner already knows: chain, double crochet, and slip stitch.
This is the version that explains everything. Not just the rounds, but the reasoning. Not just the stitches, but the decisions behind them. Whether you’ve finished two projects or two hundred, this guide is designed to get you to a beautiful, flat, gift-worthy blanket on the first try — completely free.
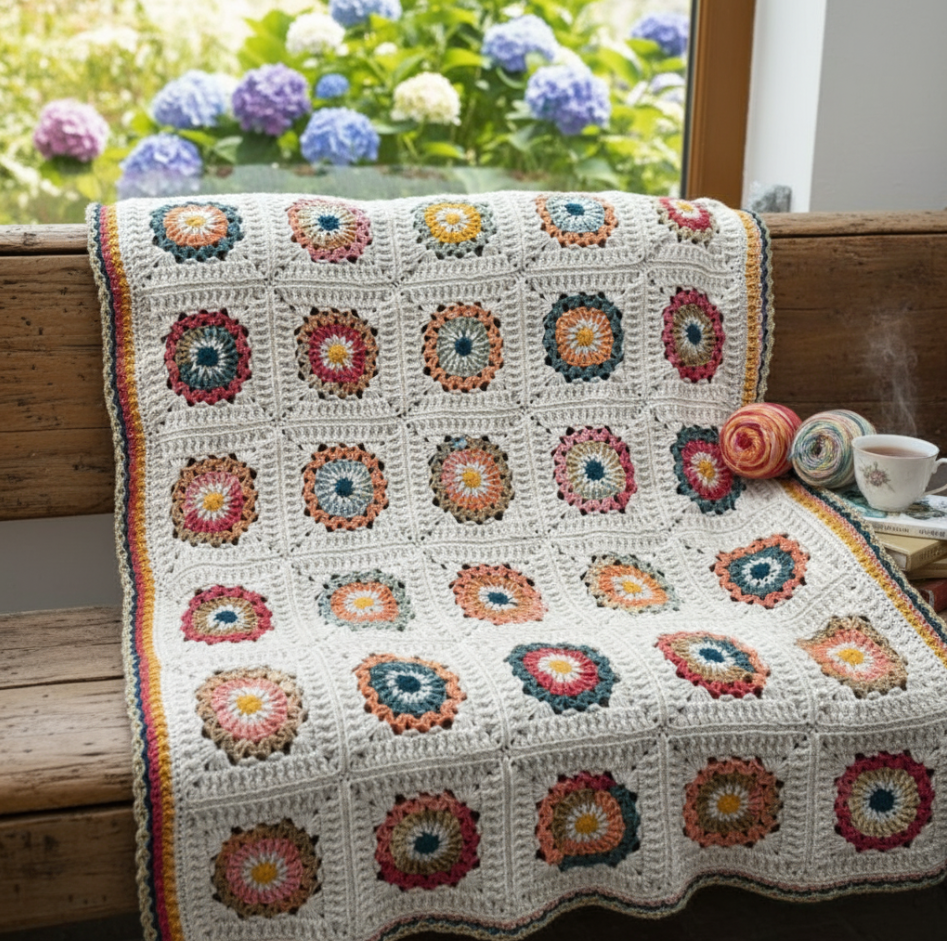
The Tranquil Garden Crochet Blanket Pattern is a free, beginner-friendly floral lap blanket crocheted in join-as-you-go granny square motifs using only chain, double crochet, and slip stitch. It measures approximately 45″ × 60″ (70 squares in a 7×10 grid), requires 6–8 skeins of worsted-weight yarn in 3–5 colors, and suits all skill levels.
What Is the Tranquil Garden Crochet Blanket?
At its core, this is a join-as-you-go (JAYG) granny square blanket — one of crochet’s most beloved formats, reimagined with a botanical lens. Each 6-inch motif uses double crochet clusters to form four petal groups radiating from a center ring, framed by a leafy border round in a contrasting color. Assembled across a 7×10 grid with deliberate color planning, those individual blooms merge into what looks like a garden seen from above: rows of color shifting like planted beds, petals catching light at different angles.
Here’s why it works so well as a beginner project: the visual complexity is entirely in the color, not the stitches. You’re repeating one simple motif — the same four rounds, over and over — while the palette does the artistic heavy lifting. For experienced crocheters, it’s a perfect portable project: self-contained squares, no stitch counting mid-round, a clear sense of progress every 15–20 minutes.
Materials & Yarn Guide
Getting your supplies right before you cast on saves significant frustration. Here’s everything you need for the standard lap blanket:
Best yarn choices: For beginners, smooth acrylic worsted yarns are ideal — Lion Brand Pound of Love, Caron Simply Soft, and Red Heart Soft all work beautifully and are machine washable. For a more elevated drape, a cotton-acrylic blend adds weight that blocks into something genuinely lush. Avoid fuzzy or bouclé yarns on your first attempt — the petal clusters need clean stitch definition to read correctly.
Stitches & Abbreviations
The Tranquil Garden pattern uses five techniques. If you know the first four, you can start right now.
The double crochet cluster (dc-cl): [Yarn over, insert hook into stitch, draw up a loop, yarn over, pull through 2 loops] × 3 times in the same stitch or space. Yarn over, pull through all 4 remaining loops. This creates the raised, dimensional petal shape that defines every Tranquil Garden motif.
Gauge & Tension — Don’t Skip This
A tension difference of just half an inch per square multiplies across 70 motifs into a blanket that’s several inches off-size. Before beginning, crochet one test square, weave your ends, wet-block it flat, and measure corner to corner.
Target gauge: One completed square (through Round 3) = 6″ × 6″ blocked. If your square measures larger, move down half a hook size. If smaller, move up. Adjust the tool, not your tension.
Full Pattern Instructions
The Flower Motif — Rounds 1 & 2 (Color A)
Each square begins with a center ring that blooms outward into four petal clusters. Work in the round from center outward.
Foundation ring: Using Color A (petal color), ch 4. Join with sl st to first ch to form a ring. Alternative: use a magic ring for a tighter, more invisible center.
Round 1 — four petals: Ch 3 (counts as first dc throughout). Work 2 dc into the ring. Ch 2. *Work 3 dc into ring, ch 2.* Rep from * 3 more times. Join with sl st to top of starting ch-3. You now have 4 petal clusters with ch-2 spaces between them.
Round 2 — petal expansion: Sl st into the ch-2 space. Ch 3. Work (2 dc, ch 2, 3 dc) into same ch-2 space — first corner. *Work (3 dc, ch 2, 3 dc) into next ch-2 space.* Rep from * for remaining 3 corners. Join with sl st. Fasten off Color A.
The Garden Border — Round 3 (Color B)
Round 3 frames the flower, forms the final square shape, and is where JAYG joining happens for all squares after the first.
Join Color B in any ch-2 corner space. Ch 3. Work (2 dc, ch 2, 3 dc) in same space. *Work 3 dc into the gap between the two 3-dc groups on the side. Work (3 dc, ch 2, 3 dc) into the next ch-2 corner space.* Rep from * around all 4 sides. Join with sl st. Fasten off, weave both ends.
Each finished motif should measure 6″ square blocked. Make your first three squares, block and measure them before continuing. This is your quality check — far easier to adjust at square 3 than at square 50.
Join As You Go — Squares 2 Onward
JAYG connects each new square to its neighbors while working Round 3, eliminating separate seaming entirely. The joins are flat, nearly invisible from the front, and create no added bulk.
- Corner join (replacing ch 2): Ch 1, sl st into the corresponding ch-2 corner space of the neighboring square, ch 1. Continue normally.
- Side join (after working 3 dc into a gap): Work your 3 dc, then sl st into the corresponding side gap of the neighboring square. Continue normally.
Assembling the Full Grid
For a 45″ × 60″ lap blanket, work a 7-wide × 10-tall grid (70 squares total). Build row by row: complete all 7 squares in Row 1, joining each to its left neighbor. Start Row 2, joining each new square both to its left neighbor and to the square directly above it during Round 3.
Before crocheting square one, map your color arrangement on graph paper. A diagonal color repeat — where each color runs at 45° across the grid — creates the signature flowing garden-row effect. Three minutes of planning transforms the finished blanket.
The Finishing Border — Rounds 1–3
The border is what takes this blanket from “nice” to finished. Work 3 rounds around the entire assembled blanket in Color C.
Border Round 1 — foundation: Join Color C at any outer corner. Ch 1, sc evenly around the entire perimeter, working 3 sc in each outer corner to keep corners flat. Join with sl st.
Border Round 2 — eyelet lace: Ch 1. *Sc into next sc, ch 1, skip 1 sc.* Rep from * around. Work (sc, ch 1, sc) into each corner sc. Join with sl st. This creates a delicate open picot effect that echoes the lacy quality of the motifs.
Border Round 3 — clean edge: Switch to Color B. Sc into every sc and ch-1 space around the full perimeter. Work 3 sc in each corner. Join with sl st. Fasten off. Weave all remaining ends securely.
Color Palette Ideas
Color is where your Tranquil Garden blanket becomes entirely your own. Here are three curated directions that work reliably with this stitch structure:
One rule for any palette: view all your yarn skeins together in natural daylight before starting. Colors behave dramatically differently under artificial light, and your “perfectly matched” selection can look jarring outdoors. This five-minute check prevents a lot of regret.
Expert Finishing Tips
The gap between a competent blanket and a genuinely beautiful one is almost entirely in the finishing. Here’s what experienced makers know:
- Block every square before joining — non-negotiable. Wet blocking opens up the dc cluster petal shapes and normalizes any tension variation across your squares. Unblocked squares join with puckering. Blocked squares join cleanly and the finished blanket lies flat on the first try.
- Weave ends immediately after each square. You have 4–6 yarn tails per motif. Weaving as you go is 90 seconds of maintenance per square instead of a dreaded three-hour end session at the finish line.
- Mark every ch-2 corner space with a stitch marker during JAYG rounds. The most common JAYG error is accidentally joining into a side gap. A bright marker in each corner makes the correct join point visually unmistakable.
- Audit gauge at square 10, not square 70. A consistent tension difference is far easier to correct early than at the end.
- Block the finished assembled blanket flat on foam mats. Pin corners first, then sides every 4–6 inches. Mist with water. Let dry 24–48 hours fully. The transformation is dramatic — joins tighten up, the surface levels, the border lies flat, and colors deepen slightly.
- Photograph before gifting. Lay the finished blanket flat in morning light near a window. These blankets photograph extraordinarily well and you’ll want the record.
How to Resize This Pattern
Because the Tranquil Garden is modular — one square = approximately 6″ blocked — resizing is arithmetic, not rework. Adjust your grid and yarn quantity; the pattern stays identical.
| Blanket type | Grid | Squares | Size | Est. yarn |
|---|---|---|---|---|
| Baby / crib | 5 × 6 | 30 | 30″ × 36″ | 3–4 skeins |
| Stroller | 6 × 8 | 48 | 36″ × 48″ | 4–5 skeins |
| Lap blanket (this pattern) | 7 × 10 | 70 | 42″ × 60″ | 6–8 skeins |
| Generous throw | 9 × 12 | 108 | 54″ × 72″ | 10–12 skeins |
| Full / queen | 10 × 14 | 140 | 60″ × 84″ | 13–16 skeins |
Frequently Asked Questions
The Tranquil Garden Crochet Blanket rewards the maker who slows down. Each square is a small, satisfying completion — a single bloom, finished and perfect before the next begins. Seventy completions later, you’ll have something that looks far more complex than it was to make, drapes like it was crafted with care (because it was), and will be used by someone who loves it for years.
Block faithfully. Weave as you go. Trust the diagonal color repeat. The garden grows one square at a time. ✿